
Cart
0

When you see those distinct circular marks on an athlete or celebrity, it's easy to wonder what’s really going on under the skin. It might look like a modern wellness trend, but using cupping for inflammation is a practice with a rich history. This isn't some new fad; cupping therapy dates back over 5,000 years, with deep roots in ancient Egyptian, Chinese, and Middle Eastern medicine.
These cultures understood how to use vacuum-based methods to pull blood to the surface and address all sorts of ailments, especially those tied to inflammation. For anyone curious about its long history, there's a great detailed overview of cupping's ancient origins and modern applications available.
The magic behind cupping’s effectiveness is its ability to create a localized, controlled micro-trauma. That sounds more intense than it is. A better way to think of it is like a focused workout for your circulatory system. When a cup creates negative pressure, it gently lifts the skin, fascia, and muscle tissue, encouraging a rush of fresh, oxygenated blood into that specific spot. This process is exactly what’s needed to fight inflammation.
The Science of Suction and Healing
The suction from the cup does more than just pull on your skin; it sets off a chain of positive responses in your body. This surge in blood flow delivers essential nutrients and immune cells to the area, which helps clear out metabolic waste and the inflammatory by-products that cause pain and stiffness.
You can actually see this process at work in the signature marks left behind. These circles show the movement of stagnant blood and fluid.
The color of the marks, which can range from light pink to a deep purple, acts as a visual guide to the level of stagnation and inflammation in the tissue below. It's not just a bruise; it’s a clear sign that the therapy has successfully kickstarted a healing response by breaking up congested areas.
How Cupping Interrupts the Pain Cycle
Beyond just getting your blood flowing, cupping for inflammation has a direct effect on your nervous system. The sensation of the suction can help interrupt pain signals traveling to the brain. Some call this the "pain-gate" theory. By giving the nerves a new, non-painful stimulus to focus on, cupping can "distract" them, often providing immediate relief from discomfort.
This dual-action approach—physically moving stagnant fluids while also calming down nerve signals—is what makes cupping such an effective tool. Here’s a quick look at its key anti-inflammatory actions:
- Promotes Vasodilation: The negative pressure helps expand blood vessels, which improves local circulation.
- Reduces Tissue Adhesions: It helps separate layers of muscle and fascia that can get stuck together, restoring mobility and reducing tightness.
- Triggers an Immune Response: The controlled micro-trauma signals your body to send in its natural repair crew to heal the tissue.
- Flushes Metabolic Waste: Stagnant fluids and cellular junk are mobilized and cleared away through the lymphatic system.
In short, cupping creates the perfect environment to encourage your body's own powerful healing abilities, targeting the root causes of your pain and stiffness.
Setting Yourself Up for Cupping Success
The difference between a so-so cupping session and one that really makes a difference for your inflammation often comes down to what you do before the cups even touch your skin. Proper preparation isn’t just a formality; it primes your body for the best possible results. Think of it like hydrating before a big workout—what you do ahead of time directly affects performance and recovery.
This prep phase gets your circulatory and lymphatic systems ready to respond, making the therapy much more effective at flushing out the inflammatory substances causing your discomfort. A well-hydrated body allows for better fluid movement, which is central to how cupping for inflammation works.
Your Pre-Cupping Game Plan
To get the most out of your session, whether you're seeing a professional or using a trusted cupping set at home, there are a few key things to focus on in the 24-48 hours leading up to your treatment. This isn’t about a stressful routine, but small, smart adjustments to your day. The main goal is to create an internal environment that’s ready to heal.
To make this easier, I've put together a checklist that breaks down exactly what to do and when. Following these simple steps can significantly boost the effectiveness of your cupping session.
Pre-Cupping Preparation Checklist
Essential preparation steps with timeline and importance level for optimal cupping results.
| Preparation Step | Timeline | Importance Level | Why It Matters |
|---|---|---|---|
| Maximize Hydration | 24-48 hours prior | High | Proper hydration makes tissues more pliable, allowing for better suction and more effective fluid exchange to flush out inflammation. |
| Eat a Light Meal | 2-3 hours prior | Medium | Avoids diverting energy to heavy digestion, allowing your body to focus on the healing response from cupping. |
| Skin Inspection | Immediately before | High | Prevents irritation or damage. Cupping should never be done on sunburns, open wounds, rashes, or active breakouts. |
| Avoid Alcohol & Caffeine | 24 hours prior | Medium | Both can be dehydrating and affect your nervous system, potentially making the session less comfortable and effective. |
| Schedule "Down Time" | After the session | Medium | Rushing to a stressful activity can counteract the relaxation benefits. Plan for a calm period afterward. |
| Mental Preparation | Immediately before | Low | Arriving with a relaxed and open mindset helps your body better receive the treatment, making the sensations more manageable. |
Following this checklist helps set the stage for a session that doesn't just feel good but delivers real, lasting relief from inflammation.
Timing and Mindset Matter
When you schedule your session can also make a big difference. Try to pick a time when you know you can relax afterward. If you have to rush off to a stressful meeting or an intense workout right after, you might undo some of the benefits. Give your nervous system a chance to absorb the treatment and kickstart the healing process.
Finally, come with an open mind. The sensations can feel a bit strange at first—a tight pulling or even a mild pinch. Understanding that this is part of the process helps you relax into the experience. Your mental state is just as important as your physical preparation for getting the best results.
Mastering Cupping Techniques For Maximum Relief
Okay, you’ve done your prep work, and now it's time to get hands-on. This is where you put theory into practice and learn how to make cupping really work for your body. It doesn't matter if you're using classic glass cups, a modern set with a suction gun, or flexible silicone cups from a brand like Lure Essentials—the core principles for getting results are the same. The goal isn't just to stick cups on your skin; it's about placing them with intention to get the best anti-inflammatory benefits.
A successful cupping session boils down to three key elements: the strength of the suction, where you place the cups, and how long you leave them on. Think of these as flexible guidelines, not strict rules. You'll get a feel for what your body needs. For instance, the acute inflammation from a freshly sprained ankle needs a much lighter touch and shorter duration than the deep, stubborn inflammation you might carry in your lower back.
Finding the Right Suction Strength and Placement
Figuring out the right amount of suction is more of an art than a science, and your body is the ultimate guide. You should feel a solid pull on the skin, but it should never be sharp or painful. If you feel a pinching sensation, that’s a sign to ease up on the suction or reposition the cup slightly. A good rule of thumb for beginners is to create a gentle lift that raises the skin about a half-inch into the cup.
Strategic placement is a game-changer for cupping for inflammation. Instead of putting a cup directly on the most painful spot, experienced users often target the muscles around it. This approach helps to decompress the entire area and boost overall blood flow. For example, if your knee is bothering you, placing cups on your quads, hamstrings, and IT band can bring more relief than focusing solely on the knee joint itself.
This image from a clinical setting gives a great visual of how this works for a common issue like back pain.
You can see how the cups are set along the large muscle groups of the back. This is a standard method for tackling widespread stiffness and inflammation in that area.
Perfecting Your Timing Protocols
Timing is another variable you can control to get the best results. Different cupping methods call for different durations, so let's break them down.
- Static Cupping: This is the most common method where you place the cups and leave them still. For inflammation, a duration of 5 to 10 minutes is typically the sweet spot. Leaving them on much longer doesn't add more therapeutic value and can sometimes cause unnecessary skin irritation.
- Flash Cupping: This technique involves applying and removing the cups quickly and repeatedly over a larger area. It’s fantastic for stimulating circulation without leaving deep marks, which makes it perfect for more sensitive spots.
- Dynamic or Massage Cupping: For this, you’ll need some oil and silicone cups. You create suction and then glide the cups over the skin. It’s an excellent way to break up fascial adhesions and is best performed for 3 to 5 minutes per area to avoid overworking the tissue.
Remember, the goal is always to encourage your body's healing response, not to overwhelm it. Start conservatively, listen to what your body is telling you, and tweak your technique as you get more comfortable. This personalized approach is the secret to unlocking real, lasting relief.
Targeting Your Specific Inflammatory Condition
When it comes to inflammation, a one-size-fits-all approach just doesn't work. The deep, nagging ache in your lower back from a long day at your desk is entirely different from the sharp, pinpoint pain of shoulder impingement. This is where your cupping practice can truly shine—by moving beyond generic application and tailoring your technique to the specific issue at hand. Customizing the placement, suction, and duration of your cupping for inflammation sessions is what turns it from a simple tool into a powerful, targeted solution.
Think about chronic lower back pain, for example. It often involves large muscle groups and inflammation that feels deep and stubborn. For this, a wider application of static cups along the erector spinae muscles—the two thick columns running next to your spine—for 8-10 minutes can work wonders. The sustained suction gets deeper into the tissue, drawing in fresh blood to release tension that's been building up for weeks or even months.
Adapting Your Technique for Common Issues
Let's break down how you can adjust your cupping method for different aches and pains. The key is to match your technique to the tissue you're working on and the specific discomfort you feel.
To give you a clearer picture, here are some specific protocols I've found effective for common inflammatory problems.
Cupping Protocols For Common Inflammatory Conditions
Specific techniques, duration, and frequency recommendations for different inflammatory conditions
| Condition | Cup Placement | Duration | Frequency | Expected Results |
|---|---|---|---|---|
| Lower Back Pain | Along the erector spinae muscles, on either side of the spine. | 8-10 minutes (Static) | 2-3 times per week | Deep muscle release, reduced stiffness, and improved range of motion. |
| Shoulder Impingement | Around the shoulder joint (anterior deltoid, infraspinatus), not directly on the point of pain. | 3-5 minutes (Static, light suction) | 2-3 times per week, on non-consecutive days | Reduced pain during movement, less "catching" sensation, improved mobility. |
| Tension Headaches | Gliding cups along the upper trapezius muscles (tops of shoulders) and base of the neck. | 5-7 minutes (Dynamic/Massage) | As needed when a headache starts | Immediate relief from neck tightness, easing of headache pressure. |
| Digestive Bloating | Gentle placement in a circular pattern around the navel. | 2-3 minutes (Static, very light suction) | 1-2 times per week or as needed | Soothing sensation, reduced feeling of fullness and pressure. |
As you can see from the table, a nagging lower back issue benefits from longer, static cupping, while a tension headache responds better to a shorter, gliding massage technique. The goal is always targeted relief, not just placing cups randomly.
Let’s look at a few of these scenarios in more detail:
- Shoulder Impingement: This kind of pain is often sharp and makes it hard to lift your arm. Instead of putting a cup right on the sorest spot, you want to address the surrounding muscles that are pulling the joint out of place. Use smaller cups on the front of your shoulder and around the shoulder blade. The key here is to keep the suction light and the time short—about 3-5 minutes—to avoid irritating the joint further.
- Tension Headaches: We've all had them—that tight band that starts in your neck and wraps around your head. This is a perfect time for dynamic cupping. Grab a silicone cup, apply a little massage oil, and gently glide it along the tops of your shoulders. This movement helps release the tight connective tissue (fascia) that's often the real culprit behind the headache.
- Digestive Inflammation: For discomfort like bloating, gentle static cupping on the abdomen can be surprisingly soothing. The most important thing here is extremely light suction; you only want to lift the skin slightly. Place the cups in a circle around your belly button and leave them for just 2-3 minutes. This mild stimulation can help calm the area and encourage gentle movement.
The following chart illustrates the measurable effects that a targeted cupping session can have on markers of inflammation within the body.
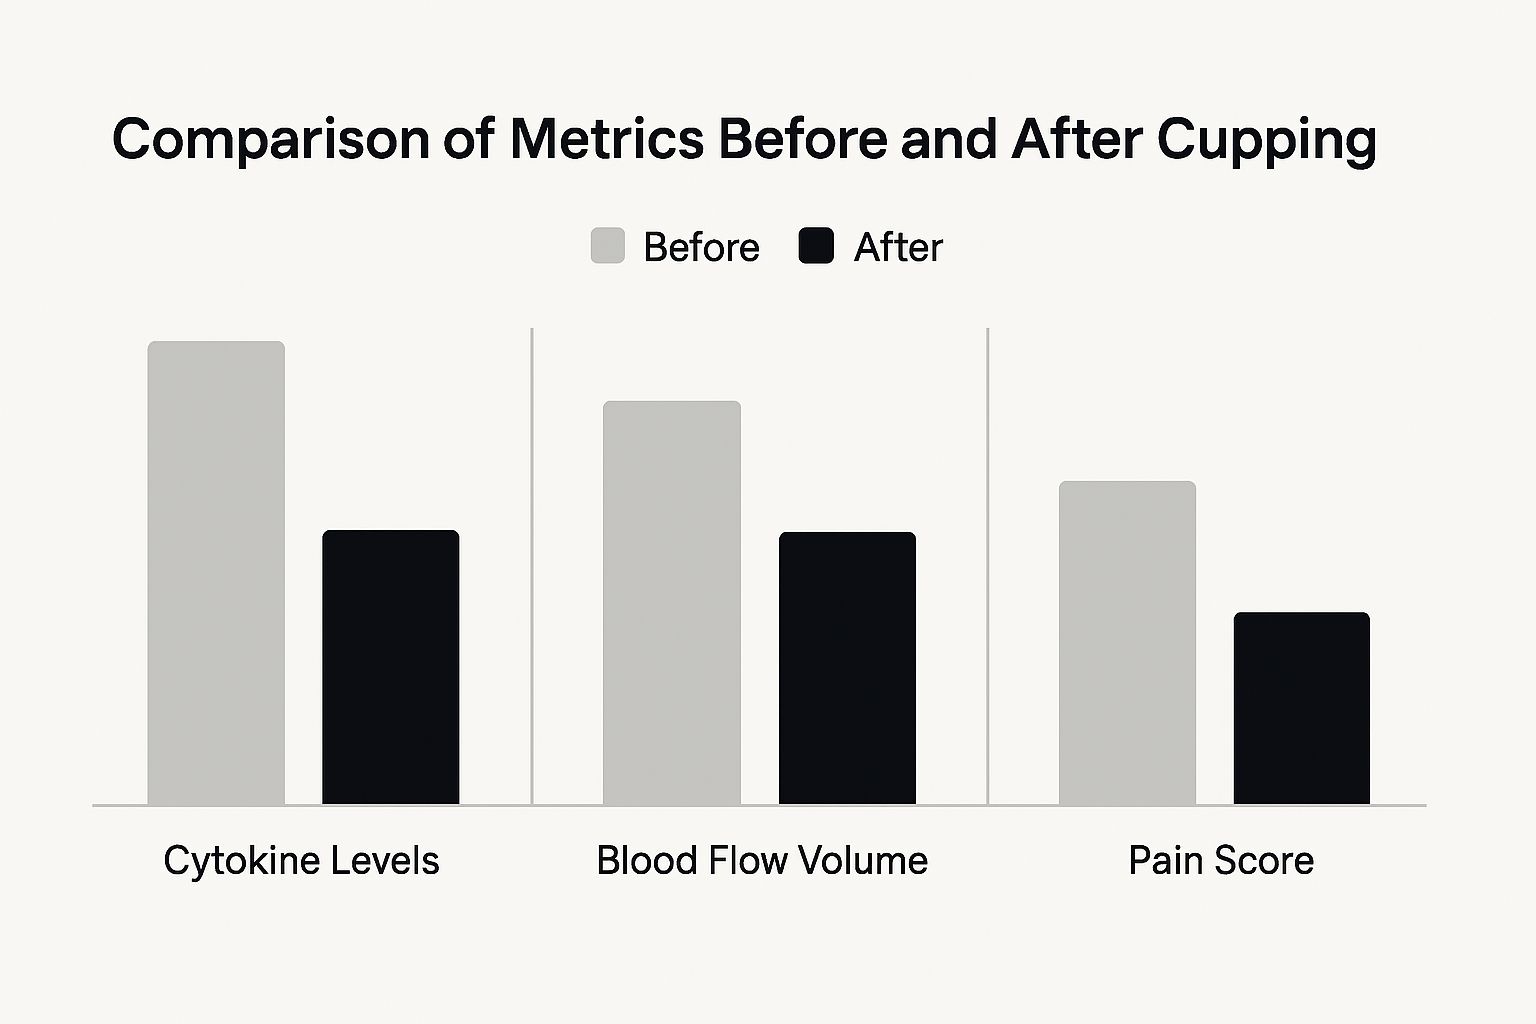
As the graphic shows, a single session can lead to a decrease in inflammatory chemicals, a significant boost in local blood flow, and a noticeable drop in how much pain you feel. This is clear evidence that a smart, specific approach can create real physiological change.
Staying Safe While Getting Results
While using cupping for inflammation can be a game-changer for many, getting the best results is tied directly to staying safe. A huge part of this is learning to tell the difference between a normal therapeutic sensation and a genuine warning sign. It’s one thing to feel a strong, tight pull—that's the therapy at work. But if you feel a sharp, pinching pain, that’s your body telling you to back off.
Most professionals agree that cupping is a safe practice when done correctly. The most common side effects are usually just some mild discomfort from the suction and, of course, the famous circular marks. However, safety isn’t just about the technique; it starts with knowing when you shouldn’t cup in the first place. Understanding these limits is key to having a positive and healing experience.
When to Avoid Cupping
There are specific situations and conditions where cupping is not a good idea. Applying cups in these cases could be unhelpful at best and potentially harmful at worst. You should always avoid placing cups over:
- Sunburns, open wounds, rashes, or active infections: The skin is already compromised, and cupping could make the irritation worse or even introduce bacteria.
- Areas with varicose veins: The suction can place too much stress on blood vessels that are already weak.
- Directly over major arteries or bony areas: This includes places like the front of your neck, armpits, or right on your spine.
- Inflamed or swollen joints from a fresh injury: It's best to wait 48-72 hours for that initial, acute swelling to go down before applying cups.
It's also important to chat with your doctor before trying cupping if you have certain health conditions like hemophilia, take blood-thinning medication, or have a history of organ failure. For those who want to dig deeper, Harvard Health Publishing has a great article discussing the safety and risks of cupping.
Listening to Your Body’s Feedback
Your body gives you the best feedback. Those dark marks that show up after a session, often called "cupping marks," are a completely normal part of the process and point to areas where circulation was stagnant. They aren't bruises and should fade within a week. However, if you notice blistering, significant swelling, or signs of a skin infection, those are red flags.
A good rule of thumb is to start with lighter suction and shorter sessions—maybe 3 to 5 minutes—to see how your body reacts. As you get more comfortable with the feeling and understand your body's tolerance, you can slowly increase the intensity. This careful, measured approach helps ensure your sessions are both safe and effective, giving you the anti-inflammatory benefits without pushing your body too far.
Maximizing Your Anti-Inflammatory Results
What you do after the cups come off is just as important as the session itself. This aftercare period is your chance to really boost the anti-inflammatory benefits and help your body process the treatment. Think of it like protecting an investment; you’ve just kickstarted a powerful healing response, and now it's time to give your body the support it needs to finish the job.
The good news is that this doesn't mean a complicated routine. The most effective actions are often the simplest ones, focused on hydration, gentle movement, and proper rest. These steps support your lymphatic system, which is working hard to clear out the metabolic waste and stagnant fluids that the cupping session brought to the surface.
Essential Aftercare for Lasting Relief
Your post-cupping game plan can make a huge difference in how long your results last and how you feel over the next few days. It's all about working with your body's natural healing rhythm, not against it.
Here are a few practical tips that experienced users and practitioners swear by to extend the benefits of cupping for inflammation:
- Hydrate, Hydrate, Hydrate: This is your top priority. Make a point to drink plenty of water over the next 24-48 hours. This helps your kidneys and lymphatic system efficiently flush out all the inflammatory byproducts released from your tissues. It's like rinsing out all the gunk the cupping stirred up.
- Embrace Gentle Movement: Hold off on that intense gym session for at least a day. Instead, choose light activities like a slow walk or some gentle stretching. This encourages healthy circulation without putting stress on the muscles and tissues that are in a sensitive recovery phase.
- Keep the Area Warm: The cupped areas have had their circulation opened up, so it's important to protect them from cold drafts or sudden temperature shifts. Simply keeping them covered helps maintain that healthy blood flow and stops muscles from tensing up again.
- A Note on the Marks: Those signature circles are a normal sign that the therapy is working. If you have a work or social event and need to cover them, use a gentle, breathable concealer after the skin has calmed down for a day. Some people even plan their sessions for a Friday to give the marks the weekend to fade.
Planning Your Follow-Up Sessions
To really get a handle on chronic inflammation, consistency is everything. While even one session can provide noticeable relief, regular treatments build on each other for a cumulative effect. The best time for your next session depends on how your body responds and how fast the marks disappear. As a general rule, waiting 5 to 10 days between sessions on the same area is a solid guideline. This gives your skin and tissues plenty of time to fully recover.
The best advice is to listen to your body. If you feel that old tightness creeping back into your lower back after a week, that’s your cue that it’s time for another session. Try keeping a simple journal to track your pain levels, mobility, and how you feel each day. This can help you spot patterns and create a maintenance schedule that keeps inflammation under control for the long haul.
Building Your Long-Term Inflammation Management Strategy
Thinking about cupping as a long-term ally against inflammation requires a practical game plan. It's about more than just a single session; it's about building a sustainable routine that fits into your real life. This often means balancing professional treatments with at-home self-care, especially if you're dealing with a chronic issue. A professional session is a fantastic investment for deep-seated inflammation or an expert assessment, while self-cupping is your go-to for consistent, day-to-day maintenance.
Your Sustainable Cupping Routine
The best results come from consistency. A great way to start is by scheduling a session whenever you feel those old familiar symptoms of stiffness or pain creeping back in. For many people, this looks like a professional treatment every 4-6 weeks, with 1-2 shorter at-home sessions each week to focus on specific problem areas.
To get the most out of your routine, keep these tips in mind:
- Track Your Progress: Keep a simple journal. Just jot down your pain levels on a scale of 1-10 before you start and after you finish. This helps you actually see the progress you're making and what works best for you.
- Maintain Your Gear: If you're cupping at home, always wash your silicone or plastic cups with warm, soapy water after every use. Good hygiene is non-negotiable for keeping your practice safe and effective.
- Listen to Your Body: If a particular spot feels extra sensitive, don't push through it. Go for lighter suction or a shorter duration. A smart approach to cupping for inflammation means adapting to your body's feedback day by day.
Ready to build your own effective, at-home cupping practice? The Lure Essentials cupping kits give you everything you need to start managing inflammation on your own terms.


